
Wireless hotspot service Karma has announced Karma Go, upgraded hardware that runs on Sprint’s LTE network instead of WiMax. When it begins shipping in December, the new US-only device will initially cost $99, but its eventual retail price will rise to $149.

Karma avoids monthly plans and contracts, instead allowing you to purchase data in chunks that never expire. The device lets nearby strangers connect to your hotspot, offering a small amount of free data to both users. Additional data starts at $14 per GB with discounts for buying in bulk.
Customers who purchased the original Karma will receive an additional discount on the new model, and any data they bought or earned will carryover. Karma Go will fall back to a 3G connection when LTE is unavailable.
Sprint’s WiMax network has largely been regarded as a failure, so Karma’s switch to LTE should make it more reliable. I tested the original Karma hardware and found it frustrating. It felt like I only managed to connect 10 percent of the time. When I asked Karma CEO Steven van Wel whether the new models will improve connectivity, he said that my 10 percent figure should rise to 90 percent, assuming of course that I’m within the coverage area.
“This is a major breakthrough for us. A big reason why we spent so much time getting the new device right was making sure the network was right,” van Wel said.
Van Wel added that he ditched his iPhone for an iPod touch in order to test his own network. According to him, he’s enjoyed an “almost flawless” experience in cities like San Francisco and New York. He averages 5-6 GB per month, which costs around $50-60.
Karma Go is rated for 220 hours of standby time and 5-6 hours of continuous use.
Karma’s ambitious long-term goal is to serve as your sole Internet provider, but it still has a ways to go before it can replace our home connections.
“We’re really thinking about how can we get rid of all those multiple subscriptions, fold it into one service that’s built for you,” van Wel said.
➤ Karma
PulseOn hands-on: A heart-rate monitor wristband born out of Nokia
The last 12 months may be remembered for many things, but in the tech realm, the surge of wrist-mounted activity-trackers will surely be one of them. Some might say there’s been too much choice .
The latest entrant to the busy space is PulseOn , a Finnish company spun out of Nokia back in 2012. Interestingly, not only did Nokia allow the technology to leave its grasps, the company actually gave the newly-formed PulseOn a grant of “thousands of euros”, while also providing a credit guarantee for a bank. This saw them good for the first 10 months before securing VC funding, and it now has 13 employees.
While a little buzz was generated around PulseOn last year off the back of a €1 million funding round, it was only last week the company opened up its wrist-band to ‘pre-orders’.
Now, by ‘pre-orders’, what the company actually means is it’s launched an Indiegogo campaign . However, we’re assured this isn’t a standard crowdfunding project – it’s being used purely as an easy way of pre-ordering the device, which is already a 95 percent-finished product. PulseOn will ship regardless of whether its $150,000 goal is met – which is why the team has opted for the ‘flexible funding’ option. All funds will go to the company irrespective of how much they raise, and you will get your watch when it starts shipping in September.
The PulseOn enters the market with one, core underlying selling point: It measures your heart-rate without the need for any special equipment such as chest-belts, and translates this information into insights.
We managed to grab a hands-on with one of these devices and took it for a spin, though given this is still technically a prototype product, it’s worth noting that some key features are missing.
At $199 ($169 on pre-order through Indiegogo), the PulseOn isn’t cheap. In fact, it’s around $50 more expensive than the premium Nike+ Fuelband SE . That’s perhaps an unfair comparison given that these are very different devices, however it’s still a useful consideration for what we’re facing here. The PulseOn isn’t a budget device.
The strap is made of a stretchy material, which I actually quite like as it makes it easy to pull on and off without fastening buckles. However, I imagine the material it’s made from will get a little, erm, ‘smelly’ the more you work-out with this on.
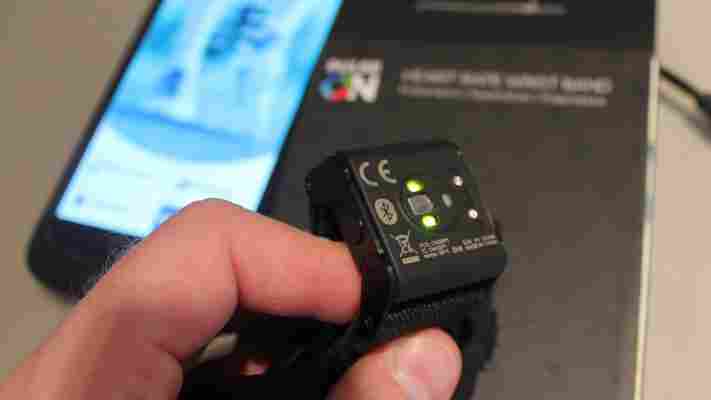
Before you set up the PulseOn, you will of course have to charge it. The watch ships with a rather quirky peg-style proprietary charging cable that clips onto the watch at one end, while plugging into a standard USB port at the other.
Next, you will have to install the associated app for Android or iOS – these aren’t yet publicly available, but they will be in time for the watch shipping later this year.
During the set up, the instructions guide you through the optimum wearing position to ensure it can track your heart-rate. You have to leave an index finger’s width between your wrist-bone and the device edge. And within the app itself, you indicate your age, gender, weight and height.
Given this is still a prototype – the app included – I did find myself making quite a few allowances. For example, the accompanying ‘Quick Guide’ makes absolutely no mention of how you’re supposed to pair-up the PulseOn with your phone. For the record, it transpires that you have to hold both the start/stop button (left) and the scrolling button (right) simultaneously for three seconds, which sends it into Bluetooth pairing mode.
Though the PulseOn will offer many of the features you expect from an activity-tracker, such as distance and calories, the core selling point is its integrated heart-rate (HR) tracker. While the Withings Pulse also features a baked-in HR monitor , it requires that you remove the device from your wrist and place your finger on the back, which is only really practical for pre- and post-exercise tracking.
With the PulseOn, it tracks your heart-rate without having to remove the band.
The PulseOn has two modes. In Standard Mode, you’ll see the time, your current heart-rate and a snapshot of your previous recorded stats. However, to beam your data to the mobile app (and thus record it), you must enter Sport Mode, which you do by hitting the Start button on the watch (left). Here, you’ll have access to a timer, heart-rate, distance, time (clock) and training effect.
Based on my tests, the heart-rate monitor worked, and it worked well. It always displayed roughly what I thought my vital stat should be for the level of activity I was doing, and I verified this on a Withings Pulse monitor too.
Over time, you’ll start to see a bigger picture of your activities and fitness start to form, with weekly, monthly and yearly overviews delivered through the app.
Now, to track your heart-rate, you can do so without your phone to hand. It’s all stored within the PulseOn itself, and will be synced up when you’re next using the app. The PulseOn’s on-board memory should be good enough for “tens of hours” of exercise.
However, for speed and distance, you will need to have your phone with you. As things stand, you cannot view the distance and speed metric from the PulseOn itself, it’s only available in the app – but this will be remedied with an update later this year.
Acknowledging the price, $200 isn’t cheap – this will really be for those with money to burn and who are hell-bent on procuring a wrist-based heart-rate monitor. Moreover, there are already other wrist-worn HR monitors on the market.
Just a few months back, the $269 Tom Tom Runner Cardio and $299 Tom Tom Multi-Sport Cardio hit the market – these may not be as ‘slight’ as the PulseOn, but they’re more watch-like, more ‘rugged’, offer GPS (no phone needed), and display more data simultaneously (including remaining battery). They’re more expensive, sure, but if you have $200 to spare for a PulseOn, would an extra $69 make that big a difference?
Ignoring the price, the PulseOn could prove to be a popular watch/wrist-band for fitness freaks. It’s more unobtrusive than the similarly-priced Samsung Gear Fit (which also has a heart-rate monitor), and is pretty accurate in terms of tracking your heart-rate. This is what it professes to do, and it does it well. But for many, this will need to be used in conjunction with other third-party apps – for example, if you like to properly track your runs, record your routes, analyze splits and other key metrics afterwards, you will still need Runtastic or RunKeeper for that.
Though this is designed to be worn as a watch too, for when you’re not busting a sweat, the charge lasted less than a day for me, which isn’t ideal. My Pebble lasts up to a week on a single charge, and I still frequently find myself sans watch when I least expect it. Based on my initial tests with the prototype, the PulseOn will be best used as a dedicated heart-rate monitor for when you know you’re going to be doing some exercise.
The PulseOn is open for pre-orders on Indiegogo now. Meanwhile, check out the official promo video below.
➤ PulseOn
Homeboy: A mini, motion-detecting home security camera that packs a punch
Cameras that clip to your body , cameras you strap to your face , cameras for your own personal flying machines , cameras for just about every occasion. Cameras are everywhere, and it seems you can’t do anything without your actions being captured for posterity .

While some may argue that the ubiquity of digital cameras leads to an invasion of privacy, the advance of hi-tech portable snappers is leading to some fun, quirky and useful innovations.
Homeboy is one such contraption: a wireless, long-life, motion-detecting home security camera that can be monitored and controlled via your smartphone. It’s a funky little bundle of CCTV joy for your humble abode.
We’ve spent the past month with the Homeboy, putting it through its paces to see what it does, what it doesn’t, and whether it’s worth the $149 asking price.
From Bluetooth-connected key-finders to me-too fitness-trackers, I’ve lost count of all the internet-enabled gadgets I’ve trialed over the past few years that promise great things, but ultimately fail to deliver at the most basic level.
The main reason is normally execution, or lack thereof. Often a good idea is spoiled due to minimal testing and a rush to get something to market.
In a connected world, things have to ‘connect’ and work flawlessly 99.99% of the time. Otherwise, they’re just too unreliable and frustrating to use. The main issue is normally getting a mobile app to play nice with the contraption in question, and there is often more than a few teething problems.
So it was against this cynical backdrop that I approached the Homeboy. But I’m pleased to say that everything worked pretty much flawlessly, bar an initial pre-launch hiccup that was fixed with a simple firmware update.
The Homeboy is a solid, shiny-white ball that’s easy on the eye – it actually resembles a cross between a ceramic eyeball and a motorcycle helmet, with a visor pulling down to conceal the camera lens.
The ball sports a microphone on the front for detecting noise, and a speaker on the back for emitting a siren. The device remains upright by sticking to a circular cradle with a magnet.
The underside of the cradle is sticky, meaning it can be adhered to pretty much any flat surface, including walls and ceilings. This is key – many similar systems require screws and other wall-ruining DIY.
Before you begin using the Homeboy, you will have to charge it using the micro USB port lodged in the back of the unit. But one of the main selling points of the Homeboy is the battery-life – fully charged, it should last around 3 months, give or take. The actual time you manage to garner from this puppy will depend on how much video you record with it, and whether the LED lights are on or not.
On its own, the Homeboy is just an expensive paper weight. You will need the accompanying Android or iOS app to get things going, through which you give the location of your camera a name, which is particularly helpful if you’re using multiple cameras.
The settings actually get pretty granular, as you can elect to record audio, have a light turn on when the camera detects motion, and more.
By default, the Homeboy records in 5-second clips. So, if it detects motion it will record for 5 seconds, and then record another 5 second clip directly after if the moving object is still present. You can increase this duration up to 30 seconds if you wish, but remember this will consume more battery.
Homeboy also has a very handy GPS feature, meaning you can automatically enable the camera whenever you vacate a designated area around the camera.
This is useful on a number of levels – you probably don’t wish to record when lots of people are wandering around your home (though you can if you want). This way, it will only switch on once you exceed a designated distance from your home – you choose ‘small’, ‘medium’, or ‘large’ depending on how far away from home you wish to traverse before the camera is triggered.
Whenever a movement is detected, you receive an alert on your phone, and you can watch the recorded clip there and then. Tap a video, and you can see exactly what’s been going on when you’ve been away.
On a few occasions, I left the house completely forgetting that the camera would be actioned as soon as I vacated the vicinity of my house. The upshot? Lots of alerts as my missus moved around the home – and lots of videos.
Yes, Homeboy is great for spying on family members, but the core purpose is of course to watch out for burglars and such like. While GPS integration is a key feature of the Homeboy, ensuring you’re only recording when not at home, it does help if you remember to manually disarm the camera (through the app) if you share a house with someone else. It’s not nice to spy on loved ones, right? RIGHT?
Another potentially useful feature is the live capture mode. You just long-press the camera in question through the app (in this case, I only have one camera set up), and you can see exactly what’s going on at any given moment.
That’s the basics of Homeboy in a nutshell, and will likely suffice for most people’s use-cases. However, it’s capable of a lot more.
Thanks to IFTTT integrations , there are a number of ‘smart home’ tie-ups that could prove useful – you can have all the lights in your house switch on or change color if the camera’s activated, though this requires Philips Hue lightbulbs. There’s also a IFTTT recipe that lets you upload all your videos to Dropbox automatically.
But all this is likely ‘fluff’ for many people. From a pure security perspective, the Homeboy has some interesting social features built in. You can set up a ‘posse’ of people who will receive notification alerts whenever a camera is activated. This means you could enlist neighbors or family to ‘watch’ your house while you’re away.
Other security features include a siren, which must be activated from within settings, that shrieks each time the camera is activated. If nothing else, it will scare the crap out of a would-be thief and force them to scarper.
You’ll be pleased to know that the videos aren’t stored locally – they’re saved directly to Homeboy servers across a number of Amazon Web Server (AWS) regions, and can be deleted easily from within the mobile app.
Overall, the Homeboy is a solid, well-built and reliable device. Having used it for the best part of a month, it never failed to activate/deactivate based on the rules set up by me, and the videos always played flawlessly.
It’s worth noting here that this doesn’t produce HD video or anything – to conserve battery and storage space, it’s been restricted to 640×480 resolution. This is fine for the purpose at hand.
The Homeboy is available and shipping to the US only for now, and will set you back $149.
➤ Homeboy